Wednesday, January 28, 2009

Dingy davits are history


My brother Bob arrived on Sunday from Ohio to help Mark and me prepare the boat for the move. As luck would have it Sunday was the last nice weather day the temperature had been dropping ever since – today (Tuesday) they are saying that we should be getting sleet and freezing rain. Rats.
 
We turned the boat around in the slip so that the guys (Jack and Bob here) can take the dingy davits off the boat.

Mast is ashore


The mast is set on Styrofoam icebergs awaiting the semi which is scheduled to arrive to move the boat on January 29th.

The crane gently moves the mast…


The crane gently moves the mast from the boat to the shore. What you do not see here is the rigger (Troy) has gone up the mast via the winch on the mast to the spreaders.
Once he has placed the hoist on the mast just above the lower spreaders he climbs back down to navigate the mast to shore.

Davis Crane Service rocks


Davis Crane Service was on time and the mast was removed with little fuss.

Mast removal...


On Tuesday we motored over to the haul out slip as we had to hire a crane to remove the mast.

Requiem for the old electric panel


When the old electric panel was removed Mark stowed it under the hardtop in the cockpit for a few months…he finally put it in the trash. We held a small Irish wake for the old panel…

The party is over and it is time to disassemble for the move


We begin to take the boat apart on Sunday, the day after the party. Here (left to right) Jack, David, Mike and Mark after the boom and main sail have been removed.
It is hard to believe it has been over 4 years since we moved the boat here.

Where was Mark and the party ends...


the party ends – hmmm – does anyone have any evidence that Mark attended this party? Honest to goodness he was there….but since I was not taking the pictures I guess he missed the boat…so to speak.

…party…


…party…

…party…


…party…

…party…


…party…

…party…


…party…

…party…


…party…

…party…


…party…

…party…


…party…

…party…


…party…

…party…


…party…

The party starts...


The party starts – we could not have asked for prettier weather. Light breeze and about 70 to 75 degrees…wow!

Radios are done


The nav office with the radios installed – now that this work is all done it is time to have the Boat Warming/Bon Voyage party.
Our window of opportunity was exactly 1 weekend before we needed to start tearing it apart to move it to Rockport, Texas.
Let the party begin...

Nav office cabinet is done


The nav office cabinet with the drawers finally installed

Forward head countertop


The forward head with the Avonite countertop

New settee cushions


The main salon with new settee cushions…

The chairs are done


The chairs with the ceiling done behind them (remember, on a sailboat a ‘ceiling’ is the hull and the roof is called the overhead).

The galley


I will let the next few pictures do the talking – here are the final ‘refit’ photos – this is the galley.
For those of you who are not close enough to come aboard I hope you can see that a lot of love went into the refit.

The main salon


I meant to take some final pictures just before the party started but never got around to it. What we have here are pictures after we pulled the mast off so it is missing from the main salon – darn, looks bigger without it but is kinda hard to sail a boat with no mast.
The art work on this bulkhead was done by Mark's Mom, Anita. She done had some beautiful pieces that we have had in our home for years and we are glad she gave some smaller ones to us that fit on the boat.

Scary beautiful floors


The new floors are scary beautiful. Naturally I put down some rugs to take the major wear and tear. In this picture the black chairs have been removed as we needed to replace the smaller screws with larger through bolts.
Our friend John Hall is a stain glass artist, he gave this ‘Cardinal’ to us recently. It found a home on the bulkhead forward of the black chairs and is a beautiful addition to our interior.

Out with the old floors...


The time finally came (on January 11, 2009) to remove the old floors and install the new ones. First we needed to remove the old floors….here they are in a dock cart. YEAH!

Wednesday, January 7, 2009

Winter arrives too early or we are leaving too late


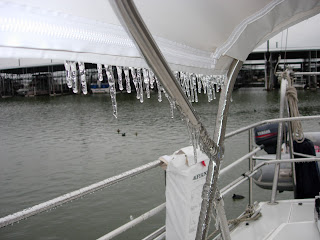
This is PROOF we stayed too long…icicles on the bimini! Yikes! We have the boat mover scheduled for 1/29/2009 (yes…I did say this month!!!)
Whew!
Happy New Year all.

The ladder in the up position


In this photo the ladder is in the ‘up’ position. There is not a chance that someone outside could accidently fall though as the ladder is in the way. Notice the door to the Nav office to the left of the ladder – we were in need of a place to keep all of our ‘To Do’ lists, reminders etc and this door has become our bulletin board. We can hardly wait until this board is clean…I wonder if that will ever happen. Right after the first of the year we begin planning the boat move. The big boat remodel projects are done, we have to empty the workshop, find the space for permanent storage of tools and ‘stuff’ and ship the boat to the gulf.

The switch is behind the ladder


We replaced the original hinges with strap hinges that permanently attaché the ladder to the boat. We then installed the actuator the up/down switch and wired it to the panel. This picture shows the ladder going up.

The ladder project is done


The reason that one new floor panel was installed is that we put a linier actuator on the companionway ladder and needed the to make sure it was installed correctly. We have been in and out of the engine room a gazillion times in the last year and each time we took the ladder off it hinges and propped it against a wall, usually in the galley. The silly thing is pretty heavy not to mention that it was always in our way. The danger was that one of us would be outside when the other moved the ladder and would not notice…needless to say a fall through the companionway would not be funny so it was a big safety issue in our opinion.

One reason we are glad the new floors are in the workshop


The new floors are still in the workshop except for one that fits under the companionway ladder. Each time we accidently mar the old floors we say ‘Gosh, I am sure glad we haven’t put down the new floors yet.’

The workshop at Jack and Karens begins to empty


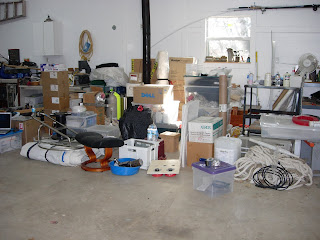
Once we finished all the plumbing and wiring in the bilges I began to drag stuff from the workshop at Jack and Karen’s out to the boat. It must seem like there is still a lot of stuff but believe me when I tell you, it is half gone.
OMG the radio panel is in and wired


The final phase of the electric panel was completed just before the new year. Mark has installed the single side band, the VHF radio, Outback Inverter and the bilge pump controllers. They are all wired and working – completion of another huge project is finally checked off the list.

Bimini side view


The new bimini is longer and the frame has been moved aft. Ever since we installed the windshield it has been difficult to climb in and out of the cockpit as the old bimini stanchion v’ed up about 6 inches away from the hardtop. The new windshield has prevented me (an others) from cracking my head on the hardtop repeatedly and let me tell how much that hurts.

New Bimini made of Stamoid


And…we also have a new bimini built and installed. We used Stamoid instead of regular canvas as it is waterproof and studier. Hopefully we won’t have to replace this for a while.

New Helm cushion


The seat behind the helm gets a special water proof foam cushion so our bums don’t get wet on passages

New cushions are installed


In the meantime we ordered and installed new settee cushions. Boy what a difference they make…the boat is finally looking close to completion.

The teak ceiling is done


The last step was to apply the last coat of varnish – here is the finished product.

The teak ceiling is glued to the hull.


We used silicone and blue masking tape to hold them in place (did not want them slipping while we slept) and left it to dry overnight.

The teak ceiling is varnished


Regardless of what they are called or where they are located they needed varnish. I put most of the coats on before they were glued to the hull.

The teak ceiling is dry fitted


As I mentioned earlier, sailors name various parts of the boat very oddly. Here on the side of the hull are new teak ‘ceiling’ planks. The ‘ceiling’ of the boat is called the overhead.

Chris varnishing parts again


The varnish queen had a few months off but had many other tasks to fill in the gap. Here I am varnishing a louvered door to go under the countertop in the aft head and a cold air return vent for the aft cabin

Marks first dovetails


Here is a side view of one of the drawers…notice the dovetails. Do I need to mention that these are very sturdy drawers?

The Nav Office cabinet is finally done


The Nav Office cabinet was installed long ago but Mark had to build the drawers. (The louvered doors we ordered as they are very difficult to make without special tools. They were varnished and installed long ago. The drawers were done and varnished well before we sold the house but Mark needed to make the wood rails for the drawer runners so they went into storage at Jack and Karen’s. He finally had a chance to make the rails and here is the completed cabinet.

The freezer looks like new as well


The freezer has two plates and they are smaller than the old plates so there is even more space in the freezer. Notice there is a little bar across the plate to the right. Two specially made ice cube trays hang on this bar and are flush to the plate. Ice is made simply in short order in this manner.

The fridge looks like new


Next, I sanded and cleaned each of the compartments to remove stains and dirt. The loose caulk was removed as well and then Mark re-caulked each compartment, again we waited about 24 hours till the caulk set. We used 3M 4200 for this job as it is a fast set caulk. The fridge compartment shown here has only one cold plate and looks like new. Though the ‘fridge/freezer’ refit was done in early December, on Christmas Eve, Mark completed installed automatic lights in this compartment. Now when we open it at night we can see the beer, oh, yeah and other food as well…too cool.

The old freezer dries out


Then we put a space heater inside to dry out the Styrofoam that we did not remove. This took about 24 hours. In preparation I cleaned out all the perishable food and stored some of it at Jack and Karen’s and the rest in a freezer that a neighbor has on the dock. The worst part is that we had no clod beer – bummer!

The old freezer needs new insulation


Here is another view of the hole in the wall after we cleaned up the mess in the bottom.

The old freezer insulation is removed


The next thing Mark did was to cut into the fiberglass (between the freezer and the compartment to the right). Kind of a messy job not to mention that in order to perform this task he had to dangle upside down to cut it with the Multi-Master. This tool has been worth it’s weight in gold and has made lighter work of many, many repair tasks.