Thursday, December 27, 2007

and a view of the floor, with and without varnish


The strips (naturally) must exactly match and it was perfect - again thanks to Marvin.

Notice how they fitted the flooring around the mast perfectly. In the top part of the picture, the flooring has epoxy applied (which is why it is shiny). The part at the bottom of the picture is raw wood.

My work begins now - it should take about 2 months till I am done varnishing.

Cabin sole work week two...


I know this will sound silly, but when they put the first sections of the new floor in I got tears in my eyes!


It was so beautiful. Marvin had done all the drawings and mechanical calculations during week one.

Here is a picture of the two craftsmen


Marvin came in and they started work on 12/2/2007. Notice the smiles before they began the job.


The first week took a toll; they got all the planning done and 2 of about 15 floor panels. It was looking grim as Christmas was coming and we had to leave to go to Kansas on the 21st so had a hard stop. Marvin could only work till the 20th and week two had a lot of rain.

Replace the cabin sole floor, surely not....


Well, yes it needed to be done and we needed a workshop in which to do it so it had to be done before we left. Also, it needs to be varnished and well cured before it can be installed so I needed to start the varnish soon after the first of the year. I called our friend Marvin and asked if he could help with the floor.


He made a huge mistake and said yes. This is a before picture with all the old flooring removed.

The boat is no better


You would think that with the house and garage trashed with boat refit stuff that the boat would be pristine. Well, ho ho you are thinking wrong. There is no sanctuary for us right now so if we call and ask if we can come over and sit in your clean house or boat perhaps you understand now.
....
Mark found some bubbles in the veneer (drat!) and the jury-rigged this two by four to press against the wall after injecting epoxy behind the bubble.

The living room looks worse!


Things are getting a bit crowded at the duplex with all the boat parts, varnish cans, drop cloths, sewing machines, etc. Every couple of weeks I put everything away and the cleaning lady (Susan) clears out all the varnish dust. I revel in a clean house for about 24 hours then start to destroy it again.

The home varnish booth....


used to be called 'living room' and 'dining room'. This is what the dining room tale looks like most days.

This is the platform (under the chairs) undergoing varnish application.

Looking from the inside out and Marvin...


In this picture, I am standing in the cockpit looking out through the new windshield/dodger. I bet my first home ec teacher (Mom) and my second home ec teacher Mrs. Goodall never had this kind of project in mind back in the 50's and 60's!!!
One person I have not yet mentioned is our friend Marvin Theobald. He and Mark worked together at Abbott for years. He has been pestering (just kidding Marv) us to let him help. Since he asked...we needed new posts to hold up the hard dodger. He did all the drawings and in this picture you can see two of them installed. They were a perfect fit!

The windshield installation


Once the front section was done I needed little to no help from Mark. The remaining 4 sections were manageable by me though I did turn the air a bit blue a few times when I messed up. The good news is that they were small errors and could be rectified easily.


I learned patience with this project...folks said I could now go into the business of making windshields/dodgers and again I turned the air a bit blue when responding to this idea.

Duraplex application...


Once the windshield was cut out and the edges were sanded a special 1" wide double sided tape was applied around the outside edge. The protective paper was removed and the windshield was applied to the vinyl very carefully. The vinyl already had the boltrope (this allows the section to be slipped into the casing on the top of the hardtop) at the top and all the zippers installed.
....
Next, I had to apply the inside vinyl gluing it to the double sided tape on the inside, turn all the seams and sew the two pieces of vinyl together sandwiching the Duraplex. WHEW!


As you can see from this picture, this front section is huge. Mark had to help lift the silly thing and hold it while I did the sewing. Once this section was done the others were easier.

I begin the dreaded windshield/dodger job


First, I had to cut and fit all the vinyl. Then I added zippers between the five sections and against the hardtop support beams to enable easy removal. Once this was done we marked where the Duraplex (they say it is very strong) windshield should be placed. Then I made a pattern and this is photo is Mark getting ready to cut the Duraplex on the table saw.

back to 2004...


This photo was taken when the boat was being surveyed. Notice the windshield/dodger. It is made of canvas and plastic and in very poor condition. It needed replacing and Mark decided that I would be the girl for that job. Well, I was not very excited about this prospect and have been dragging my heels. Now that is it done, I wish I had done it earlier though it was a stressful job.

the proud settee craftsman


Here is Mark with the finished product. Now it is ready for the varnish booth.

The settee lid


The next picture is the top of the new settee. This is in 'glue-up' position. I think all the clamps in garage are attached! Ok, I guess we have a few more.
The elevation in the back is a 'garage' for the teak folding table that my Dad and Mom made for us years ago. It was a bit big for our last boat cockpit but it fits great in this one, and we needed a place to store it safely.

Mark makes the smaller settee...


In between times Mark is making the smaller settee that goes against the main bulkhead. This is the bottom part. We were checking the fit (inside is the Sailrite sewing machine I will use shortly to make the windshield/dodger).

and a LONG time later the new chairs are installed...


There was much work done in between the 'old' settee and the new chair platform but I will spare you those gory details. Suffice it to say it took a LONG time and a lot of work. The whole platform was made then varnished. The backsplash behind the chairs had to be remade too and varnished. The chairs are on a hinge and tip out (easily) to get to the much reduced storage below. Currently the doors for the cabinets on the backsplash (one behind each chair) are in the 'varnish' booth at the house - this is what I now call our living and dinning room.


We still need to make the cabinets above the chairs - that is the next big project.

The 'chair' plan...continued...


Many cuts later the old settee is gone and I am crying for the storage lost.

The 'chair' plan...


Mark then drew the outline of the 'Sawzall plan' with blue tape. And whipped out the Sawzall ....

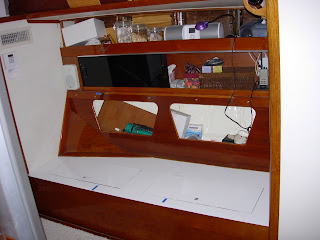
Starboard settee before the Sawzall


Now it is time to start on the right-hand (starboard) settee deconstruction. Mark has decided that he wants easy chairs instead of a couch. Sounds easy huh? In this photo (with the cushions removed) we survey what needs to be done.


We call this the 'before' picture....

New veneer on the bulkhead


Once the port cabinets were done it was time to spiff up the main bulkhead. Mark ordered the veneer and cut it to size. We prepared the wall by sanding it, applying contact cement glue and then applying the veneer.

Port cabinets in...but not quite varnished yet...


The cabinets are done and the mixer is in it's 'in use' position. Notice also that Mark had custom built the cabinet for the mixer. There is a little flipper door that opens/flips down so that the mixer platform has room, then the cabinet door closes. The door can not flop around when I am using the mixer. Cool, huh?

I have now become an accomplished varnisher. Most of the varnish on these cabinets was done except for the trim on the two center ones.

and we have to re-veneer the main bulkhead


Mark decided to remove part of the settee (booth) and make it smaller. As a result, the teak on the wall behind that part of the settee had to be replaced. DRAT! Scope creep.


In this picture we have removed the old wood and just have glue and paint showing now. Notice that there is one cabinet frame in place to the left of the bare wall. Making some progress on the cabinets but they are taking a lot longer than we expected.

Main Salon port cabinets under construction


Mark and I then tore out the cabinets on the left (port) side of the main salon. What you can see in this photo is the fiberglass hull above the settee (couch). The chain plates are visible.
Notice there is a glass of wine on the table. Mark and I decide we are glad that we drink...

and my Kitchen Aid mixer too?


I had the bright idea to house my Kitchen Aid mixer in the cabinet to the right of the dishwasher. Then, when I wanted to use it, it should swing out on a platform and hover over the countertop where the dishwasher is when it is stowed. Easy for me huh?


Mark went into action and built a swinging platform. It really only took him a month or so....of course we both had full-time jobs at the time so he only had to work on it 4 weekends in a row. But, the end result is spectacular and it is soooo convenient. Again, he does spoil me....but then I spoil him too.

A sailboat with a dishwasher?


Now you know I am spoiled. Mark and I had many discussions about this decision. I went back and forth like a yo-yo. Finally I decided for the dishwasher as I hate dishes in the sink.

Mark developed a 'dumb waiter' type system to house a European (can you think small?) style dishwasher. At a touch of a button it rises out of the counter and goes into storage the same way.
I LOVE MY DISHWASHER!

The Galley is updated next....


If you take a look at the oldest picture on the blog and compare it to this one you can see a HUGE difference. Since Mark knows how much I like to cook he made updating the galley an early 'refit' priority. The propane stove was the first thing to go. It was a priority as most of the piping was leaking!

Then, we found new counter top material (Avonite) and Mark became an expert counter top craftsman, added a new sink and faucet. Then it was back to the woodshop to fashion new teak fiddles to go around the counter top.

Why do they call wet wood 'dry rot'


We also discovered that the decking around the chain plates have (gulp) dry rot. Again, for the non-boating types dry rot happens when deck fittings are not properly sealed when they are installed. Water gets into the plywood decking and makes it wet and soggy. After some coaching from Mark, I undertake the task of digging out the old wet wood. Once this is done and all is dry I begin applying epoxy to fill in the voids left by the dry rot. No small task I might add.

Chain plates arrive!


The chain plates finally arrive! As you can tell from this picture of the old and new ones they really did need to be replaced. (Hint: The old ones are rusty...)

Main Salon before we tear it apart...


The interior of the boat looked like it was built in 1987…which it was.


It's just another day in retirement....

We have had so many questions: How the boat refit is going? Can you send me pictures? When are you leaving?

I thought I would start a blog and post some notes and pictures. So here goes.
We are working so hard on the boat that it does not seem like we are retired. The plan was to leave last month...hmmm...but we still have a lot to do so now I am saying 'We will leave sometime next year'.

This is 'Silhouette' in Florida during August 2004. Our friend Jack Hall came with us for a week (his vacation, the nut!) to help. We worked like dogs for that week. We did sail one day and go 40 miles north to Ft. Pierce. There we put the boat on the 'hard' and started taking it apart for the trip to Texas. It was a lot of work and Jack was a lot of help - I don't know what I would have done without him on the dis-assemble project. Mark was working on installing a bow thruster so Jack and I got to do a lot of work together and had fun doing it